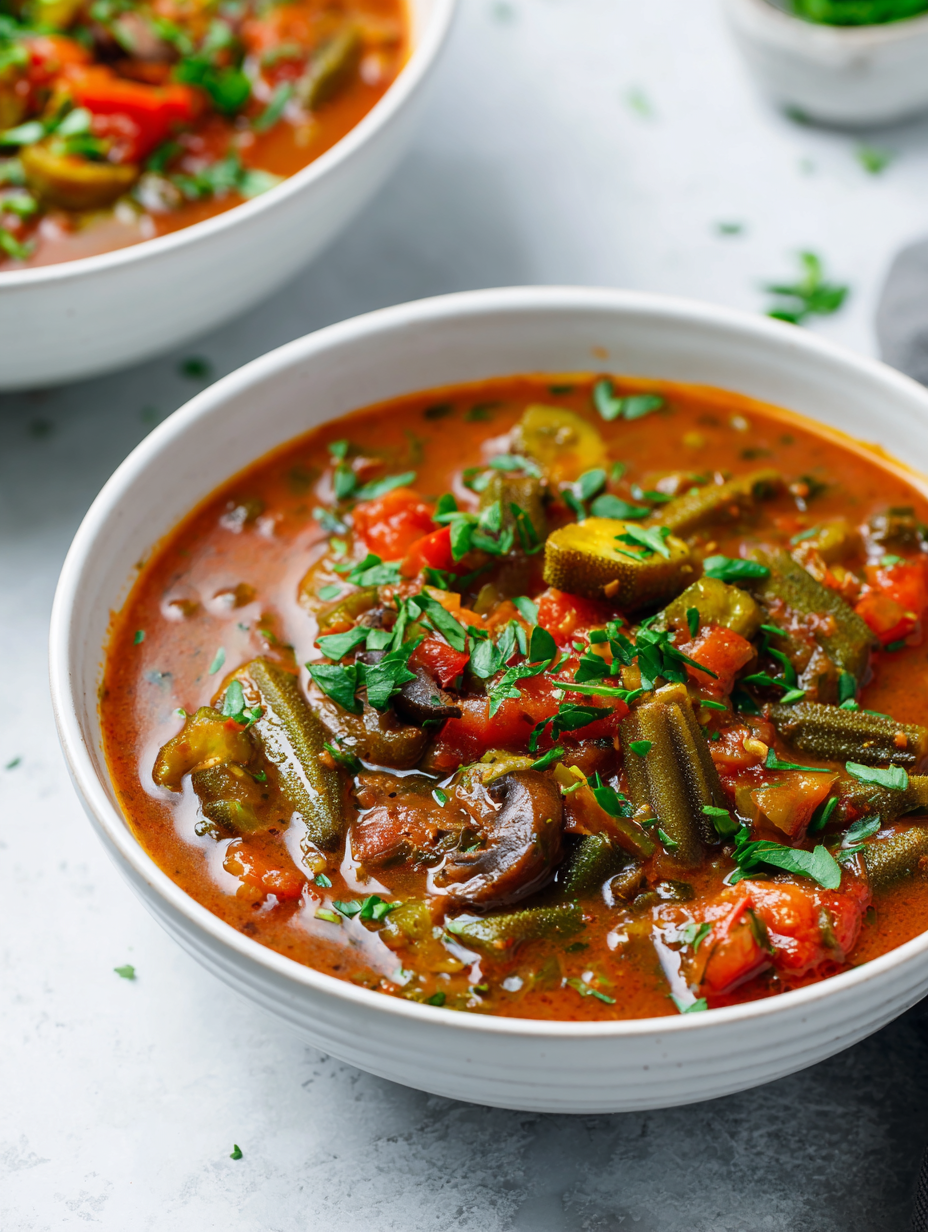
Blog

  • Cherry Bliss: The Secret Ingredient to a Perfect Slushie

    Cherry Bliss: The Secret Ingredient to a Perfect Slushie

    If you think cherry slushies are just for summer kids, think again. I’ve been experimenting with different ways to make them more nostalgic yet surprisingly gourmet. The secret? A splash of balsamic vinegar that enhances the sweetness and depth of those bright red cherries.

    This recipe is a celebration of simple ingredients, elevated by a trick I uncovered that makes every sip feel like a small, icy adventure. It’s perfect for a lazy afternoon or a quick cool-down that feels just a little more special than usual. Plus, it’s so easy to whip up, even in the busiest kitchen.

    Cherry Balsamic Slushies

    Cherry balsamic slushies are icy, vibrant beverages made by blending fresh or frozen cherries with a splash of balsamic vinegar, sugar, and ice until smooth. The final texture is thick and frosty, with a deep red color and a balanced sweet-tart flavor enhanced by the balsamic. They offer a refreshing, spoonable consistency perfect for hot days or special occasions.
    Prep Time 10 minutes
    Total Time 10 minutes
    Servings: 2
    Course: Main Course
    Calories: 80

    Ingredients
      

    • 2 cups frozen cherries pitted and frozen
    • 1 tablespoon balsamic vinegar good quality
    • 2 tablespoons sugar adjust to taste
    • 1 cup ice cubes

    Equipment

    • Blender
    • Measuring cups and spoons
    • Knife
    • Cutting board

    Method
     

    1. Measure out the frozen cherries, balsamic vinegar, sugar, and ice cubes to prepare for blending.
    2. Add the frozen cherries into the blender, followed by the balsamic vinegar and sugar.
    3. Pour in the ice cubes, ensuring they complement the freezing process and help achieve a thick texture.
    4. Blend all the ingredients on high speed until the mixture is smooth, thick, and frostily textured, about 30-60 seconds. You should see the cherries break down and the mixture become uniformly red and icy.
    5. Stop the blender and check the texture; it should be thick and spoonable with a bright red color and a glossy surface.
    6. Pour the cherry slushie into glasses or bowls, making sure to serve immediately for the best frosty texture.

    Notes

    For a sweeter or more tart flavor, adjust the sugar or balsamic vinegar to your taste before blending.

    Amid the cozy chaos of spring and summer seasons, this cherry slushie offers a refreshing break. It reminds me of childhood days, but with a sophisticated twist that keeps me coming back. A bowl or glass of this chilled delight feels like a small victory against the heat and stress.

    Making this at home means I get to control the sweetness, which is a relief on those days I crave balance. Share it with friends or enjoy it solo—either way, it’s a simple pleasure worth savoring. And as the chilled fruit coats my tongue, I’m reminded just how comforting a tiny bit of frozen fruit can be.

  • The Secret Sauce for an Unforgettable Eggplant Parmesan Experience

    The Secret Sauce for an Unforgettable Eggplant Parmesan Experience

    Eggplant Parmesan isn’t just comfort food; it’s a nostalgic dance on your taste buds. But what if I told you that the secret to elevating this classic lies in a surprising twist? I recently experimented with a dash of smoked paprika and a sprinkle of roasted garlic, transforming this humble dish into a smoky, savory masterpiece.

    When I make Eggplant Parmesan, I notice the kitchen fills with a warm, cheesy aroma that feels like a cozy hug on a rainy day. The crispy, golden eggplant slices combined with gooey cheese create a texture contrast that’s utterly satisfying. This recipe is also a perfect way to enjoy a plant-based meal that’s packed with flavor and heart.

    What makes this version stand out is the balance between tradition and innovation. It’s ideal for those craving comfort but also eager to explore new flavor layers in their cooking. Whether you’re new to eggplant or a seasoned veggie enthusiast, this dish promises a delightful experience every time.

    Smoky Eggplant Parmesan

    This version of Eggplant Parmesan involves slicing and breading eggplant, which is then baked until crispy and layered with a smoky tomato sauce, melted cheese, and roasted garlic. The final dish has a golden-brown crust with gooey, cheesy layers and a tender interior, showcasing a balance of textures and rich flavors.
    Prep Time 30 minutes
    Cook Time 40 minutes
    Total Time 1 hour 10 minutes
    Servings: 4
    Course: Main Course
    Cuisine: Italian-inspired
    Calories: 350

    Ingredients
      

    • 2 medium eggplants sliced into 1/4 inch rounds
    • 1 cup bread crumbs for coating
    • 1/2 cup parmesan cheese grated
    • 2 cups mozzarella cheese shredded
    • 4 cloves garlic roasted
    • 2 cups tomato sauce preferably smoky-flavored
    • 3 tbsp olive oil divided
    • 1 tsp smoked paprika for flavor and color
    • 1 pinch salt
    • 1 pinch black pepper

    Equipment

    • Baking sheet
    • Large skillet

    Method
     

    1. Preheat your oven to 400°F (200°C). Slice the eggplants into 1/4 inch rounds and set aside. Roast the garlic cloves in the oven wrapped in foil until soft and fragrant, about 20 minutes.
    2. In a small bowl, mix bread crumbs, grated Parmesan, smoked paprika, salt, and pepper. This will be your seasoned coating mixture.
    3. Brush the eggplant slices with 1 tablespoon of olive oil on both sides. Dip each slice into the seasoned bread crumb mixture, pressing gently to adhere and creating a crispy coating.
    4. Arrange the coated eggplant slices on a baking sheet lined with parchment paper. Bake for about 20 minutes until golden brown and crispy around the edges.
    5. Meanwhile, chop the roasted garlic and stir it into the tomato sauce for a smoky, garlicky flavor. Warm the sauce gently on the stove until heated through.
    6. Once the eggplant slices are done, start assembling the dish in a baking dish or oven-safe casserole. Spread a layer of tomato sauce on the bottom, then add a layer of eggplant slices. Repeat with sauce and eggplant, finishing with a layer of sauce on top.
    7. Sprinkle the shredded mozzarella evenly over the top layer of sauce, then add the remaining Parmesan cheese for extra flavor.
    8. Bake the assembled eggplant Parmesan in the oven for 20-25 minutes, until the cheese is bubbling and golden brown on top.
    9. Remove from the oven and let rest for 5 minutes to allow the layers to set. Serve hot, garnished with fresh herbs if desired.

    Eggplant Parmesan is a dish that brings people together, whether for a family dinner or a quiet night in. Its rich flavors and crispy textures make it a timeless choice that adapts easily to any season or occasion. This version, with its smoky, cheesy twist, aims to inspire your home-cooking adventures.

    Enjoy the process as much as the plate. This recipe reminds us that a little creativity and a pinch of patience can turn simple ingredients into something truly special. So go ahead, indulge in a slice of this golden, cheesy goodness—your taste buds will thank you.

  • Halloween Dirt Cake: The Gummy Worm Twist You Never Knew You Needed

    Halloween Dirt Cake: The Gummy Worm Twist You Never Knew You Needed

    Every Halloween, I find myself craving something fun, creepy, and delicious. This year, I decided to give a classic kids’ treat a spooky upgrade with chocolate crumbs, cream, and the ever-enticing gummy worms. The best part? It’s so simple to assemble that chaos in the kitchen becomes part of the charm.

    There’s a nostalgic thrill in seeing layers of dark soil-like crumbs topped with wriggly worms, reminiscent of childhood adventures and mischievous pranks. Plus, this dessert is irresistibly messy—exactly how I love my Halloween treats. It’s a perfect way to turn everyone into giggling monsters at your next spooky gathering.

    Halloween Gummy Worm Dirt Cups

    These Halloween-themed dessert cups feature a crumbly chocolate soil layer topped with creamy filling and wiggly gummy worms, creating a fun, messy, and visually spooky treat. The dish is assembled in layers, with textures ranging from crunchy to smooth, and finished with playful worm garnishes that evoke a creepy crawl feeling.
    Prep Time 15 minutes
    Cook Time 10 minutes
    Total Time 25 minutes
    Servings: 4
    Course: Main Course
    Cuisine: American
    Calories: 250

    Ingredients
      

    • 1 cup chocolate cookie crumbs preferably Oreo or similar
    • 1 cup cream cheese softened
    • 1/2 cup powdered sugar
    • 1 cup whipped cream lightly whipped
    • Gummy worms gummy worms for decoration

    Equipment

    • Mixing bowls
    • Measuring cups and spoons
    • Small serving cups or jars
    • Spatula
    • Spoon

    Method
     

    1. Crush the chocolate cookies into fine crumbs using a resealable bag and rolling pin or a food processor until they resemble soil. Set aside.
    2. In a mixing bowl, beat the softened cream cheese with powdered sugar until smooth and creamy, about 2-3 minutes.
    3. Gently fold the whipped cream into the cream cheese mixture, creating a light, fluffy filling.
    4. Spoon a layer of cookie crumbs into the bottom of each serving cup, pressing slightly to form a base layer that mimics soil.
    5. Top the cookie crumbs with a generous dollop of the creamy filling, spreading evenly with a spatula.
    6. Insert gummy worms on top of the creamy layer, gently pressing them into the filling to appear as wriggling worms emerging from the soil.
    7. Repeat the layering process if desired, finishing with a crumb topping and some gummy worms as a final creepy touch.
    8. Serve immediately to enjoy the contrasting textures, or refrigerate for up to 1 hour before serving for a firmer bite.

    This dirt cake is more than just a treat—it’s a conversation starter, a photo prop, and a sweet distraction from the spooky chaos outside. The combination of textures, from crunchy crumbs to chewy worms, keeps everyone reaching for more. It captures the essence of Halloween with just a few ingredients and a whole lot of fun.

    As the pumpkin flicker dims and the party winds down, this dessert leaves everyone with sticky fingers and big smiles. It’s a simple joy to craft and an even bigger delight to devour. Sometimes, the best memories come from the messiest, most playful moments in the kitchen.

    ,

  • Chill Your Soul: The Unexpected Magic of Oreo Slushie

    Chill Your Soul: The Unexpected Magic of Oreo Slushie

    On especially warm days, I find myself craving more than just ice cold drinks; I want comfort in a cup. The Oreo Slushie hits that sweet spot, blending childhood nostalgia with a refreshingly modern twist. There’s something about the way the creamy chocolate cookies mingle with the icy chill that instantly transports me back to carefree summer afternoons.

    What makes this recipe truly exciting isn’t just its taste but the fun of mastering a more unconventional icy treat. You don’t need fancy gadgets—just a blender and some frozen Oreos—and you’re set for a quick, satisfying escape to snack heaven. Plus, it’s a perfect way to use up those cookie stash cravings.

    Oreo Slushie

    The Oreo Slushie is a cold, creamy beverage made by blending frozen Oreo cookies with milk until smooth. It has a thick, frosty texture with visible cookie chunks, resulting in a dessert-like drink that combines rich chocolate flavor with icy refreshment. The final appearance is a swirled, dark-colored drink served in a glass, perfect for hot days.
    Prep Time 5 minutes
    Total Time 5 minutes
    Servings: 2
    Course: Main Course
    Cuisine: American
    Calories: 250

    Ingredients
      

    • 12 pieces Oreo cookies frozen
    • 1 1/2 cups milk cold

    Equipment

    • Blender
    • Measuring cup

    Method
     

    1. Place the frozen Oreos in a blender bowl.
    2. Add cold milk to the blender with the Oreos.
    3. Secure the lid on the blender and blend on high speed until the mixture becomes thick, smooth, and evenly chocolate-colored, about 30-45 seconds. You should see the cookies breaking down and the mixture starting to swirl smoothly.
    4. Pause briefly to scrape down the sides if necessary, then give it another quick blend to ensure everything is combined with some cookie chunks remaining for texture.
    5. Pour the thick, icy Oreo mixture into glasses, letting it swirl and mound up with a slightly frosty surface.
    6. Serve immediately with a straw or spoon, enjoying the creamy, chocolatey texture that’s perfect for a hot day.
    These Oreo Slushies are more than just a simple frozen sip—they’re a small, sweet miracle for any hot day. They remind us that comfort foods can be quick, cool, and incredibly satisfying without complicating our lives. Plus, they’re a fun reason to gather friends or indulge solo when nostalgia hits hard.

    Enjoy the icy burst of chocolate, the crunch of cookie bits, and the cool breeze of summer in every sip. It’s a little recipe that dreams are made of—simple, delicious, and just the right amount of chaos to keep things interesting.

  • The Secret Ingredient That Turns Peach Crisp Into Pure Nostalgia

    The Secret Ingredient That Turns Peach Crisp Into Pure Nostalgia

    Baking a peach crisp might seem straightforward, but playing with unusual spices can unlock new layers of flavor. Recently, I tried adding a pinch of saffron and a splash of vanilla bean paste, transforming this humble dessert into an aromatic masterpiece. As the peaches release their sweet, fragrant juice, the aroma alone makes the kitchen feel warm and inviting.

    This is not your typical summer fruit bake. Instead, it’s a nostalgic journey into childhood memories with a sophisticated twist. Whether you re sharing it at a family gathering or enjoying a quiet moment alone, this recipe promises a comforting yet exciting experience. It’s a celebration of seasonal sweetness paired with unexpected depth.

    Spiced Peach Crisp with Saffron and Vanilla Bean

    This peach crisp features ripe peaches baked with a spiced topping infused with saffron and vanilla bean paste, creating an aromatic and flavorful dessert. The dish has a bubbling, golden-brown topping with tender, juicy peaches underneath, offering a comforting yet sophisticated finish.
    Prep Time 15 minutes
    Cook Time 40 minutes
    Total Time 55 minutes
    Servings: 6
    Course: Main Course
    Cuisine: American
    Calories: 250

    Ingredients
      

    • 4 cups peach slices ripe and peeled
    • 2 tablespoons cornstarch to thicken juices
    • 1/4 cup granulated sugar for sweetness
    • 1/2 teaspoon saffron threads soaked in warm water
    • 1 teaspoon vanilla bean paste or vanilla extract
    • 1 cup old-fashioned oats for topping
    • 1/2 cup all-purpose flour for crisp topping
    • 1/2 cup light brown sugar packed
    • 1/4 cup unsalted butter cold and cut into small pieces

    Equipment

    • Mixing bowls
    • Baking dish
    • Chef’s knife
    • Measuring cups and spoons
    • Oven

    Method
     

    1. Preheat your oven to 375°F (190°C) and prepare a baking dish by lightly greasing it.
    2. In a mixing bowl, combine the sliced peaches with cornstarch, granulated sugar, and the saffron threads dissolved in a small amount of warm water. Mix gently until the peaches are coated thoroughly.
    3. Spread the peach mixture evenly into the prepared baking dish, ensuring the peaches are layered smoothly and juices begin to bubble around the edges.
    4. In a separate bowl, stir together the oats, flour, and brown sugar to create the crisp topping. Cut in the cold butter using a pastry cutter or your fingers until the mixture resembles coarse crumbs.
    5. Sprinkle the crumble topping evenly over the peaches, covering the surface completely for an even bake.
    6. Bake the peach crisp in the preheated oven for 40 minutes, or until the topping is golden brown and the filling is bubbling around the edges.
    7. Remove from the oven and allow to cool slightly before serving. The aroma of saffron and vanilla will fill the kitchen as it bakes, and the topping should be crisp and deliciously crumbly.
    In the end, a peach crisp is more than just a dessert — it’s a reflection of seasonal abundance and shared stories. The process of baking, smelling, and tasting creates a sensory memory that lingers long after the last spoonful.

    So go ahead, experiment with your favorite spices or toppings. This simple dessert adapts to your mood and pantry, making each bake a little special. Every forkful whispers a story of summer’s fleeting joys and cozy evenings at home.

  • The Haunted Mix: Spooky Blood-Red Bloody Mary for Halloween

    The Haunted Mix: Spooky Blood-Red Bloody Mary for Halloween

    Every October, I get excited to transform a familiar classic into something a bit more sinister. This Halloween Bloody Mary isn’t just a drink; it’s a visual experience that sparks conversations and curiosity at any party. The vibrant blood-red color and eerie garnishes turn an ordinary brunch into a haunted celebration.

    What makes this recipe special is how it balances the shocking look with a surprisingly refreshing taste. The secret is in the smoky spices and a dash of fiery tomato juice that mimics a spooky, bubbling potion. It’s a fun twist that invites everyone to indulge in a little chaos while savoring familiar flavors.

    Halloween Bloody Mary

    This Bloody Mary is a spicy, tomato-based cocktail with a rich red hue and smoky spices, served with eerie garnishes to resemble a haunted potion. It combines fiery tomato juice with bold seasonings, resulting in a refreshing yet visually striking beverage with a slightly thick, vibrant appearance.
    Prep Time 10 minutes
    Total Time 10 minutes
    Servings: 4
    Course: Main Course
    Cuisine: American
    Calories: 120

    Ingredients
      

    • 2 cups tomato juice preferably spicy or smoky for depth
    • 1 tbsp Worcestershire sauce
    • 1 tbsp hot sauce or adjust to taste
    • 1 tsp smoked paprika adds smoky flavor and color
    • 0.5 tsp celery salt
    • 0.25 tsp black pepper
    • 1 slice lemon for garnish and extra tang
    • optional black olives, cherry tomatoes, or cocktail skewers for spooky garnishes

    Equipment

    • Cocktail shaker
    • Measuring jigger
    • Stirring spoon
    • Tall glasses

    Method
     

    1. Measure out the tomato juice and pour it into a cocktail shaker or mixing pitcher.
    2. Add Worcestershire sauce, hot sauce, smoked paprika, celery salt, and black pepper to the tomato juice.
    3. Seal the shaker and stir vigorously for about 10 seconds until all ingredients are combined and slightly frothy.
    4. Fill tall glasses with ice cubes and pour the seasoned tomato mixture into each glass, leaving some space at the top.
    5. Slice the lemon into wedges and squeeze a bit of fresh lemon juice into each drink for extra brightness.
    6. Garnish each Bloody Mary with eerie accents like black olives, cherry tomatoes, or skewers to resemble spooky decorations and add visual intrigue.
    7. Serve immediately with a straw or stirrer, allowing the vibrant red color and spooky garnishes to shine.

    This cocktail isn’t just festive; it’s a conversation starter, perfect for Halloween night. It’s a reminder that sometimes, chaos in a glass makes the most memorable moments. Cheers to a spooky season filled with creative sips and chilling fun.

    Enjoy this bloody good drink as the perfect ending to your haunted evening. It captures the spirit of Halloween with every sip—quirky, bold, and a little wicked. Here’s to a season of spirited celebrations and ghoulish gatherings.

  • Chill Out with the Unusual: The Art of Making a Lush Chocolate Slushie

    Chill Out with the Unusual: The Art of Making a Lush Chocolate Slushie

    On a sweltering summer day, traditional cold treats can sometimes feel a bit too predictable. That’s where this chocolate slushie steps in—a brew that combines childhood nostalgia with a daring twist of icy decadence. As I blend the cacao and ice, the kitchen fills with the rich aroma of cocoa, reminding me of cozy afternoons and spontaneous celebrations.

    This recipe isn’t just about cooling down; it’s about transforming simple ingredients into a playful, frozen masterpiece. It’s perfect for those who crave something more than just a typical ice cream or milkshake—something with texture, a touch of chaos, and a lot of flavor. Plus, it’s ridiculously easy, making it the kind of treat you’ll want to make often.

    Chocolate Slushie

    A frozen beverage made by blending cocoa, ice, and sweeteners into a thick, icy consistency with a rich chocolate flavor. The mixture results in a velvety, slushy texture that’s perfect for hot days or indulgent treats, showcasing a smooth, frosty appearance with swirls of dark cocoa.
    Prep Time 5 minutes
    Total Time 5 minutes
    Servings: 2
    Course: Main Course
    Cuisine: Dessert
    Calories: 180

    Ingredients
      

    • 2 cups ice cubes
    • 1/4 cup unsweetened cocoa powder preferably Dutch-processed
    • 1/4 cup granulated sugar you can adjust for sweetness
    • 1 teaspoon vanilla extract
    • 1/2 cup milk whole or your preferred type

    Equipment

    • Blender
    • Measuring cups and spoons

    Method
     

    1. Add all the ice cubes to your blender, creating a solid base for the slushie.
    2. Pour in the milk, then add the cocoa powder, sugar, and vanilla extract on top.
    3. Secure the lid tightly and start blending on low speed to break up the ice.
    4. Gradually increase the speed to high and blend until the mixture becomes thick and slushy, with a smooth, frosty texture.
    5. Stop the blender and check the consistency; if it’s too thick, add a splash more milk and blend briefly to loosen.
    6. Pour the chocolate slushie into glasses, allowing the rich cocoa mixture to swirl attractively with ice crystals.
    7. Optionally, garnish with chocolate shavings, a drizzle of chocolate syrup, or a dollop of whipped cream for extra flair.

    Notes

    For a creamier texture, substitute some milk with heavy cream. Adjust sweetness to taste by adding more sugar if desired.

    Every sip offers a fragment of childhood combined with the thrill of tailored indulgence. The smooth, icy chocolatey goodness feels decadent yet refreshing, especially on hot days or when unexpected guests arrive.

    Whipping up this slushie can become a spontaneous ritual, a quick escape from the everyday. It’s a reminder that simple ingredients, when handled with a bit of courage, create moments worth savoring. No matter the season, this icy delight promises a cooling splash of joy in every glass.

  • Halloween Bat Wings: The Spooky Soy Sauce Chicken Delight

    Halloween Bat Wings: The Spooky Soy Sauce Chicken Delight

    Every October, I find myself craving something that combines the festive thrill of Halloween with bold, unexpected flavors. These Halloween Bat Wings are not your average chicken wing—they’re shaped like tiny bats, ready to roost on your platter. The secret? A savory soy sauce marinade that gives them a shiny, dark glaze perfect for any spooky spread.

    Crafting these bat-shaped wings is an adventure in itself. The aroma of soy, garlic, and a hint of ginger will greet you as they bake, filling your kitchen with a nostalgic warmth. They’re great for parties, but I love making them just for a little fun and a break from the usual.

    WHY I LOVE THIS RECIPE?

    • It sparks childhood memories of Halloween costumes and spooky stories.
    • The crispy skin paired with umami-rich marinade creates a perfect bite.
    • Seeing the bats come to life in the oven makes me feel like a kitchen wizard.
    • They are surprisingly simple to prepare, with a big visual impact.
    • The dark soy glaze cracks and shimmers in the light, adding to the eerie vibe.

    AVOID MY DISASTER (You’re Welcome)

    • FORGOT to cut the wings properly? They won’t take the shape. Cut carefully before baking.
    • DUMPED too much marinade? The wings will be soggy. Use a light coat for crispness.
    • OVER-TORCHED the edges? They’ll turn black fast. Keep an eye on your oven temp.
    • FORGOT to pat the wings dry? The marinade won’t stick well. Pat them dry first.

    QUICK FIXES THAT SAVE YOUR DAY

    • When wings stick, splash a little oil on the baking sheet before placement.
    • Patch soggy wings by broiling for 2 minutes—crisp up that glaze.
    • Shield delicate wings from burning with foil tenders—easy rescue.
    • Forgot to marinate? Skip ahead—brush on soy glaze mid-baking for flavor.
    • When in doubt, add a splash of sesame oil for extra aroma and shine.

    Halloween Bat Wings

    Halloween Bat Wings are shaped chicken wings marinated in a savory soy sauce mixture, then baked until crispy with a shiny, dark glaze. The wings are cut and formed into small bat shapes, creating an eye-catching and flavorful appetizer with a crispy exterior and tender interior. They are perfect for spooky celebrations and party spreads.
    Prep Time 20 minutes
    Cook Time 30 minutes
    Total Time 50 minutes
    Servings: 4
    Course: Main Course
    Cuisine: American
    Calories: 250

    Ingredients
      

    • 2 lbs chicken wings preferably drumettes and flats for easier shaping
    • 1/4 cup soy sauce for marinade and glaze
    • 2 cloves garlic minced
    • 1 teaspoon fresh ginger grated
    • 1 tablespoon honey for slight sweetness
    • 1 teaspoon sesame oil optional, for aroma and shine
    • to taste salt and pepper for seasoning

    Equipment

    • Baking sheet
    • Sharp knife

    Method
     

    1. Pat the chicken wings dry with paper towels to ensure they’ll marinate and crisp up properly in the oven.
    2. Mix soy sauce, minced garlic, grated ginger, honey, and sesame oil in a bowl to create a savory marinade and glaze. Whisk until well combined.
    3. Place the chicken wings in a large bowl or zip-top bag and pour in the marinade. Toss well to coat all pieces evenly. Let them marinate in the refrigerator for at least 15 minutes or up to 1 hour for more flavor.
    4. Preheat your oven to 400°F (200°C). Line a baking sheet with parchment paper or lightly spray with cooking spray to prevent sticking.
    5. Arrange the marinated wings on the prepared baking sheet in a single layer, leaving a little space between each piece for even cooking.
    6. Bake the wings for 25-30 minutes, flipping halfway through, until the skin is crispy and browned, and the glaze is bubbling and shiny. Keep an eye on them near the end to prevent burning.
    7. While the wings bake, prepare a small knife and cutting board. Once out of the oven, let the wings cool slightly so they can be shaped.
    8. To shape the bat wings, carefully cut each chicken wing into two parts: the drumette and the flat. Use the knife to carve minor notches to resemble tiny bat wings at the ends of the flats.
    9. Using the cut pieces, assemble small bat shapes by attaching the wings with a little leftover marinade or toothpicks for support if needed. The wings should resemble mini bats with outstretched wings.
    10. Serve the bat-shaped wings on a platter, drizzle with any remaining glaze, and garnish with sliced green onions or sesame seeds if desired for extra flair.

    Notes

    For extra crunch, broil the assembled bat wings for 2 minutes at the end of baking. Use toothpicks carefully and remove before serving.

    These Halloween Bat Wings are a fun and flavorful way to celebrate the spooky season. The crispy skin, dark glaze, and bat shapes make them a hit at any gathering or quiet night in. They remind me that food can be playful and beautiful, even in the chaos of holiday prep.

    Every time I make these, I rediscover the joy of turning simple ingredients into a little piece of Halloween magic. Whether you’re serving these for a party or just craving something whimsical, they’re sure to delight. In the end, it’s all about the messy joy of creating something memorable from everyday pantry staples.

    }

  • Pumpkin Muffins with a Secret Spice Twist

    Pumpkin Muffins with a Secret Spice Twist

    As the air turns crisper and leaves begin to crunch beneath your boots, I find my thoughts drifting to cozy mornings. This pumpkin muffin recipe isn’t your typical holiday bake—it’s infused with a pinch of cardamom and a splash of molasses, giving it an unexpected warmth.

    There’s something about the way the pumpkin’s earthy sweetness mingles with the spicy notes and the slight chew of whole wheat flour. The smell alone, laced with cinnamon and a hint of ginger, instantly transports me to a fall kitchen full of unhurried mornings and shared stories.

    What makes this recipe truly special is how the fragrant spices elevate humble pumpkin to a captivating treat. It’s perfect for those quiet moments where comfort food feels just right, yet it’s so simple you’ll want to whip up a batch every weekend.

    Spiced Pumpkin Muffins with Cardamom and Molasses

    These pumpkin muffins combine pureed pumpkin with warm spices, whole wheat flour, and a touch of molasses for richness. They are baked until golden with a moist, tender crumb and a gently domed top. The addition of cardamom and ginger gives them a fragrant, cozy aroma and a slightly chewy texture.
    Prep Time 15 minutes
    Cook Time 20 minutes
    Total Time 35 minutes
    Servings: 12
    Course: Main Course
    Cuisine: American
    Calories: 180

    Ingredients
      

    • 1 1/2 cups whole wheat flour
    • 1 cup pumpkin puree preferably homemade or unsweetened canned
    • 1/2 cup molasses dark or light, based on preference
    • 1 cup brown sugar
    • 1/2 cup vegetable oil
    • 3 large eggs
    • 1 1/2 teaspoons ground cinnamon
    • 1 teaspoon ground ginger
    • 1/2 teaspoon ground cardamom
    • 1/2 teaspoon baking soda
    • 1/2 teaspoon salt

    Equipment

    • Mixing bowls
    • Whisk
    • Measuring cups and spoons
    • Muffin tin
    • Paper or silicone muffin liners
    • Spatula

    Method
     

    1. Preheat your oven to 375°F (190°C) and line a muffin tin with paper liners or lightly grease it.
    2. In a large mixing bowl, whisk together the dry ingredients: whole wheat flour, cinnamon, ginger, cardamom, baking soda, and salt until evenly combined.
    3. In another bowl, combine the pumpkin puree, molasses, brown sugar, and vegetable oil. Whisk until smooth and well integrated, and the mixture feels slightly thick and fragrant with spices.
    4. Add the eggs one at a time to the wet mixture, whisking well after each addition until the mixture is smooth and slightly frothy.
    5. Pour the wet ingredients into the bowl with the dry ingredients, then fold gently with a spatula until just combined. The batter will be thick but moist and speckled with spices.
    6. Spoon the batter evenly into the prepared muffin tin, filling each cup about three-quarters full. The batter should mound slightly at the top.
    7. Place the muffin tin in the oven and bake for 18–20 minutes, or until the muffins are golden brown and a toothpick inserted into the center comes out clean.
    8. Remove the muffins from the oven and let them cool in the tin for 5 minutes. Then, transfer to a wire rack to cool completely and set the moist crumb.
    9. Once cooled, enjoy these fragrant, moist muffins with a warm cup of tea or coffee, or pack them for a cozy breakfast or snack.

    Notes

    For a slightly sweeter version, add an extra tablespoon of brown sugar. To enhance flavor, sprinkle some chopped nuts or dried cranberries on top before baking.

    In the end, these muffins aren’t just about flavor—they’re a little ritual that makes mornings more meaningful. The combination of seasonal ingredients and a pinch of culinary daring turns an everyday snack into something memorable.

    So, next time you’re craving autumn in a bite, this recipe is there to remind you that good things happen when you add a touch of spice and a whole lot of love to simple ingredients.

  • Lazy Cook’s Ultimate Lasagna Soup Trick

    Lazy Cook’s Ultimate Lasagna Soup Trick

    Imagine coming home after a long day, craving comfort but lacking the time to layer a real lasagna. This soup transforms the familiar flavors into a quick, one-pot marvel that captures all that cheesy goodness in every spoonful. The best part? No boiling water for noodles or waiting through long bake times.

    This recipe is perfect for anyone who loves robust tomato aroma, melted cheese dripping from every bite, and the slight crunch of fresh herbs. It’s a lazy girl’s shortcut that doesn’t skimp on flavor, just clever use of pantry ingredients and a little bit of love. Who says cozy meals need hours to prepare?

    Cheesy Tomato Soup with Pasta

    This dish is a creamy, hearty tomato-based soup enriched with melted cheese and cooked pasta, served in a single pot for easy preparation. The soup is thick and smooth with a slightly chunky texture from the pasta and herbs, making it a comforting and filling meal.
    Prep Time 10 minutes
    Cook Time 20 minutes
    Total Time 30 minutes
    Servings: 4
    Course: Main Course
    Cuisine: American
    Calories: 320

    Ingredients
      

    • 1 tablespoon olive oil
    • 1 small onion finely chopped
    • 2 cloves garlic minced
    • 1 can (14 oz) crushed tomatoes
    • 2 cups vegetable broth
    • 1 cup pasta small shapes like ditalini or shells
    • 1 cup shredded cheese cheddar or mozzarella
    • to taste salt and pepper
    • 2 tablespoons fresh fresh basil chopped, optional garnish

    Equipment

    • Large saucepan
    • Wooden spoon

    Method
     

    1. Heat olive oil in a large saucepan over medium heat until shimmering. Add the finely chopped onion and cook, stirring occasionally, until translucent and soft, about 5 minutes.
    2. Stir in the minced garlic and cook for another minute until fragrant; you should smell a warm, aromatic aroma filling the air.
    3. Pour in the crushed tomatoes along with their juices and stir well, allowing the mixture to bubble gently and thicken slightly, about 3 minutes.
    4. Add the vegetable broth to the saucepan, stir, and bring the soup to a gentle boil.
    5. Once boiling, stir in the pasta, reduce the heat to medium-low, and cook uncovered, stirring occasionally, until the pasta is tender and the soup has thickened, about 10 minutes.
    6. Stir in the shredded cheese until melted and the soup appears creamy and smooth, about 2-3 minutes.
    7. Season with salt and pepper to taste, and sprinkle chopped fresh basil for brightness.
    8. Serve hot in bowls, garnished with extra basil if desired, for a comforting, cheesy tomato soup with pasta.

    This lasagna soup is more than just a meal; it’s a reminder that comfort food can be quick and customizable. The layers of flavors and textures make each bowl a little celebration of simplicity and flavor. It’s perfect for busy nights or when you need that nostalgic hit of home.

    With this recipe, you’ll master the art of transforming ordinary ingredients into something memorable. No matter the season, the aroma and taste will keep you coming back for more. Sometimes, the best dishes are the ones made with a little chaos and a lot of heart.